Building an Automation Model
Introduction
The Automation component of the Runbook has a graphical representation, called automation model, that resembles a flowchart diagram and that is hosted in a Page. It defines the specific steps and business logic that orchestrate and automate the process.
The building blocks of the Automation Model are the ActionTasks, which contain the application or business logic, other Runbooks, and flow control elements.
Design Approaches
You can approach the Automation design phase in one of two ways:
- Build the automation model first, leaving the ActionTask implementation for later.
- Build ActionTasks or reuse existing ActionTasks for the various parts of the process that you are automating and then combine them into the Runbook.
In any case, consider defining the following solution elements before starting building a Runbook:
- What ActionTasks are needed
- How do ActionTasks interact with each other (the automation model logic)
- What resources and access will be required for the ActionTasks to work (IDs, passwords, mechanisms such as SSH or Telnet)
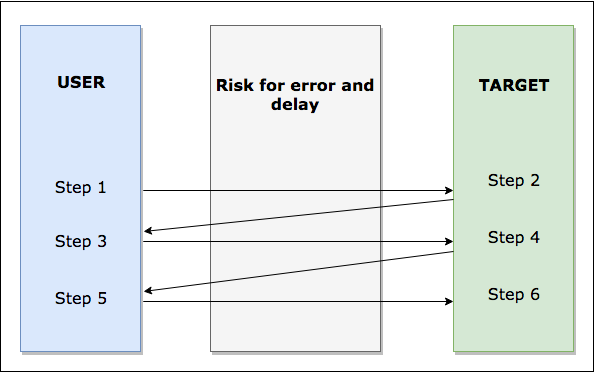
Process Before Automation
The diagram below visualizes how the risk of errors and/or delay increases when a manual process, without automation, is applied. The area of vulnerability is the interaction between the user and the target. Without automation, risk factors exist like typos, missed procedures, delays in response, overlapping work, operating on the wrong compute resource, and so on.
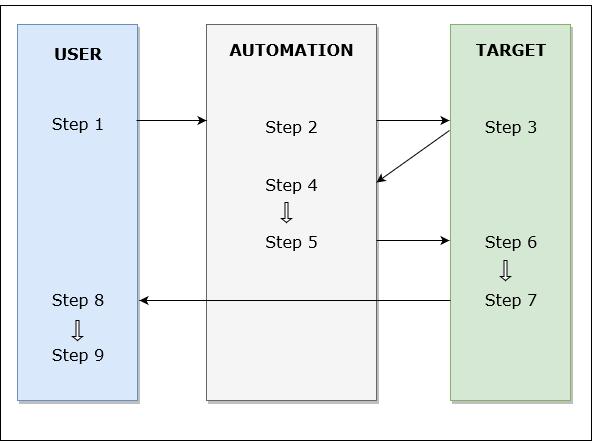
Process After Automation
The diagram below visualizes how the risk of error and/or delay decreases when automation is introduced. This approach accelerates the processing time and removes much of the effort from the user. As a result, the potential for errors and delays is minimized. The idea is not to remove the human out of the process but to automate manual tasks that are repetitive, simple, and slow.
Main Model and Abort Model
Each Automation can have a pair of automation models:
- Main Model - Represents the intended process in steps that get followed when the Runbook executes.
- Abort Model - Executes only if the Main process aborts or times out. The Abort Model is optional.
The Main Model is the primary, intended process for the Runbook, but if a timeout or failed execution occurs, the Runbook switches to the Abort Model. You can use the Abort Model to recover after the intended process aborts, either by completing or cleaning up the process.
When an abort occurs, processing of the Main Model terminates. Any "in-flight" ActionTasks will complete and results will be available on the worksheet. ActionTasks that have not yet started will not execute. After the Main Model terminates, the Abort Model (if one exists) executes.
Runbook execution has a distributed nature. The abort execution logic cannot be placed in the Main Model because the Main Model may be in a suspended state at a remote host. This results in the system triggering a separate "clean-up" Abort Model.
Due to the same reasons, any variables not persisted during the execution of the Main Model cannot pass from the Main Model to the Abort Model (INPUTS, OUTPUTS, GLOBALS, or FLOWS). An exception is PARAMS, which will be sent with the initial Runbook execution. Only the initial PARAMS sent to the Main Model will be sent to the Abort Model. Additional PARAMS added later, or any changes to those PARAMS, will not be sent to the Abort Model.
For example, if Runbook starts with the PARAMS A=1, changes A = 2, and adds B=3 to the PARAMS map during execution, the Abort Model would be triggered with only A=1.
Best practices on how to effectively employ Abort Model include:
- The Abort Model should remain simple. It should not be the second attempt to complete the original task but rather a way to clean up the system and/or to notify operators to intervene.
- If Abort Model needs additional information to update the external record or to save them to log, that information must be saved to WSDATA unless it is already a part of the initial PARAMS sent to the main Runbook execution. Non-essential information should not be saved since it adds unnecessary overhead and increases the speed of execution.
- The Main Model should build in sufficient allowance and mechanism to gracefully handle exceptions. For example, the timeout for a Runbook should be long enough, i.e. 10 minutes, to allow for the heavy production load. In addition, the sub-Runbook or ActionTask should have set appropriate timeout value and should lead to exception handling logic if the timeout occurs.
Automation Model Workflow
The general steps for creating the main model or the abort model of an Automation include:
- Add Start and End elements. These are required.
- Add one or more Task elements and/or Automation elements.
- Optionally, add Precondition elements to control the flow.
- Configure all Task, Automation, and Precondition elements.
- Connect the elements using the Connector element.
- Configure the connectors.
The sections below detail each of the steps.
You use the Automation Designer to create automation models. See the Automation Designer Overview guide to learn about its UI elements.
Adding Start and End
The Start and End model elements are special system tasks used to define the flow of the automation. The only attributes you can set for them are present in the Properties Panel.
The properties of Start and End are used to configure the behavior of the entire automation.
Start Element Properties
The Start element has only Input properties.
It is not recommended to set the Start properties to anything else than CONSTANT values.
| Property | Description |
|---|---|
| MODEL_TYPE | Only for internal use. Do not set. |
| PROCESS_DEBUG | Set to true to enable the user to debug outputs. |
| PROCESS_CONCURRENT_LIMIT | Maximum number of concurrent Runbook executions. Note: cannot be a sub-Runbook. |
| PROCESS_DISPLAY | Set this field to the name of the wiki or Decision Tree to display when the worksheet is viewed. |
| PROCESS_TIMEOUT | Runbook Process Timeout (in minutes).* PROCESS_TIMEOUT is set to 30 minutes explicitly for System.GitPushAutomationChanges runbook. |
| MODEL_MODE | Only for internal use. Do not set. |
| WIKI_PROCESS | Wiki process document name. |
End Element Properties
The End element has only Input properties.
| Property | Description |
|---|---|
| MODEL_TYPE | Internal Only |
| END_SEVERITY | Optional input parameter for the end severity. |
| END_CONDITION | Optional parameter to set the end condition. |
| END_QUIT | END_QUIT to false if executed within a subprocess. |
| END_TYPE | Type of process assessment (i.e. BEST or WORST) |
| END_WAIT | Wait for 'x' seconds before processing process completion calculations. END_WAIT is typically used when the process dynamically executes task based on runtime information. The delay allows these dynamic tasks to complete before calculating total process duration and status information. |
| MODEL_MODE | Only for internal use. Do not set. |
| WIKI_PROCESS | Wiki process document name. |
Connecting Elements
The three Connector element types help link the automation model elements. The Connector is a directional arrow that defines the model pathways and the sequence of actions. Having different Connector types only serves visual and house-keeping purposes. Aside from those, all types have the exact same functionality.
Each endpoint of the Connector needs to connect to a Task, Automation, or Precondition.
Adding a Connector to the Model
Keep the correct direction in mind when connecting model elements.
Use either of the following methods to connect model elements:
- To quickly connect a pair of elements with a Straight Connector, hover the cursor over the center of the element where you want the Connector to start. After an arrow icon appears, drag-and-drop the arrow to the element where you want your Connector to end. note
If you drag away from an object but do not connect it to another existing object, then a duplicate is created.
- Drag-and-drop the desired Connector type (Straight, Horizontal, or Vertical) from the Designer Panel onto the work area and then drag-and-drop each of its endpoints onto the pair of existing elements that you want to connect.
Changing the Connector Shape
Use the following pointers to modify Vertical and Horizontal Connectors.
- Drag-and-drop the midpoint handle of the Connector to form the desired curve.
- Double-click the midpoint handle to change the Connector orientation between vertical and horizontal.
Configuring a Connector
After you add a Connector, you can optionally set its properties. These properties can have an effect on the automation model flow.
You can edit the following Connector properties in the Properties panel on the right:
- Display Name: Optional name that appears over the connector line in the model.
- Condition: Determines which Connector pathway is followed by task execution, depending on the task condition. The options are: None, Good, or Bad. The line color automatically changes as you select the condition. None is gray, Good is green, and Bad is red.
- Completion: Determines whether the Connector pathway is followed by task execution.
Adding an Event
The Event element is one of the means for managing the automation flow. It offers an alternative to using multiple sub-Automations when it is necessary to wait for some user interaction or an external event before proceeding.
Events allow Automations to pause execution while waiting for an external event (external to that Automation) to occur. In this context, "event" refers to the Resolve Actions Pro construct as follows:
- Independent of other types of external events (for example, a Netcool event picked up by gateway).
- The two can be connected programmatically in an Actions Pro solution (for example, received Netcool event triggers an Actions Pro event that resumes an automation).
Events allow for easy Worksheet management by resuming execution on the same worksheet. Events can be short-term or long-term:
- Short term: Kept in memory, event expected to occur in minutes/hours.
- Long term: Written to database, event expected to occur in days/months. Execution can theoretically be suspended indefinitely.
Configuring an Event
The only attributes you can set for an Event are present in the Properties Panel.
The events' default display Merge option value is managed through the automation.merge.policy.default system property that allows you to set the default value to ALL or ANY. Set it to the value that you use most often in your automation models. The merge option that you select for Merge in the Event Properties sidebar always takes precedence over the default system property value.
Event Constructs
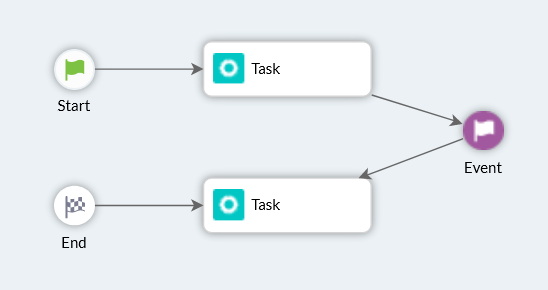
Two main components of events are: Listener and Sender. The listener Event element is available in the Designer Panel and causes an automation to pause execution while waiting for the event.
The following figure shows an event pause:
Events do not need to be predefined. Use inputs to set parameters for the event. The sender events are sent or triggered via an ESB message. Actions Pro provides a pre-built ActionTask to trigger events (send event#resolve) in the default task library. Parameters for this task must match the parameters for the event listener you wish to trigger. The "send event" code can be incorporated into custom tasks or scripts in other places in Actions Pro (for example, script in a gateway).
Event Mechanics
Be sure to add the Event element to the automation model at the point where the execution is to pause. Edit the inputs to set parameters that configure/identify the event. For the triggering Runbook, add the send event#resolve ActionTask and edit the inputs to set parameters that match the Event element the first Runbook.
The following table described the parameters of the send event#resolve ActionTask:
| Parameter | Description |
|---|---|
| EVENT_EVENTID | Unique identifier for this event. This value is an arbitrary, user defined value that distinguishes this event from other events in the same automation. |
| EVENT_REFERENCE | Identifier used to specify the execution instance of this event. Typically set to PROBLEMID but can also be user defined or correlate to an external value (for example, external evented, ticket number, etc.). |
| EVENT_END | If set to true, the execution state of the Runbook along with all the working data gets removed from memory and written to the database. Keep in mind the overhead of keeping data in memory vs cost of writing it to the database. Should be used for long-term events. |
| EVENT_TIMEOUT | How long before the event times out and the Runbook continues executing. If not set, the Runbook waits until it times out. |
| ALERTID | Parameter that looks up and uses the Worksheet with the specified ALERTID value. The PROBLEMID must be set to "LOOKUP". |
| PROCESSID | The Runbook execution processid (optional). Either the PROCESSID or the EVENT_REFERENCE parameter must be provided. |
| WIKI | The Runbook to be executed starting at the eventid specified. START must be set to "true". |
| EVENT_START | Set to "true" to start a new Runbook process at the specified eventid to continue a "hibernated" process execution. |
| PROBLEMID | The value of the Worksheet to use for the new Runbook to be executed. Set PROBLEMID to "LOOKUP" to use an existing worksheet of a executed Runbook defined by REFERENCE or ALERTID. Requires START set to "true". |
| REFERENCE | This value is used to look up and use the worksheet with the specified REFERENCE value. The PROBLEMID must be set to "LOOKUP". |
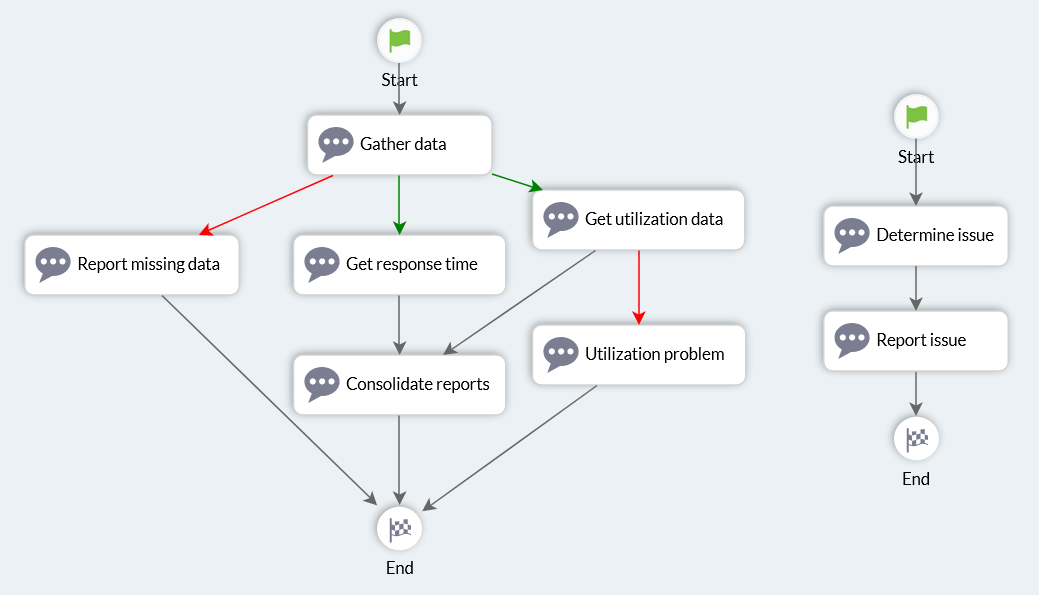
Example Using Multiple Events
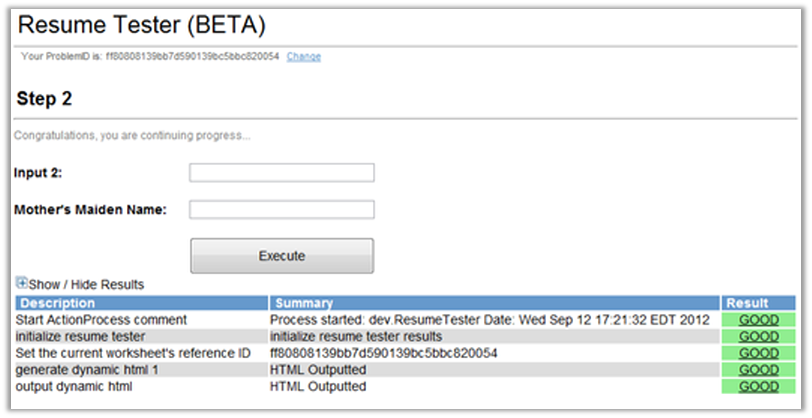
This example shows a multi-step process with three events. The event listeners and trigger are contained in the same automation. The precondition checks for a flag that tells it whether this is the first execution or a resume execution.
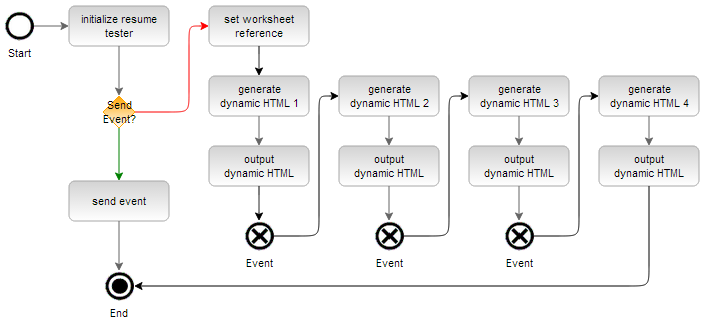
The Runbook page uses a form dynamically generated by the task detail. Execution pauses at each event and prompts the user for input before continuing.

Because the Runbook is self-contained and has multiple small steps, this approach is easier to manage and more practical than using multiple automations.
EVENT_REFERENCE is a keyword and should only be used for finding the specific execute state, and that if PROCESSID and EVENT_REFERENCE are given, EVENT_REFERENCE will take precedence.
Adding a Task
The Task element adds an ActionTask to your automation model. You can add an existing ActionTask from your library or create a new ActionTask that will be added to the library.
Selecting an Existing ActionTask
Adding an existing ActionTask is a way to reuse logic between Automations and even inside the same Automation. You can customize the ActionTask after adding it, such as by adding extra INPUT variables, which will not affect the original ActionTask in your library.
Take these steps to add an existing ActionTask:
- From the Designer Panel, drag-and-drop he Task element onto the work area:
- Drop it on an empty space to create its inbound and outbound connections later;
- Drop it onto an existing connector (wait for the connector to become blue first) to place it on the path between two existing objects.
- In the Task Wizard on the right, click Select an existing Task.
- In Select Task, do one of the following to select an ActionTask:
Note: ActionTasks use the following naming format in the automation model:<taskName>#<namespaceName>.<subnamespace>.- Start typing the ActionTask name and select it from the filtered list.
- Click the Search (magnifier) icon to open a content browser where you can browse by menu path or namespace.
- Click the down-arrow icon to open a drop-down list containing all available ActionTasks.
- Click Done.
- In the Task Properties panel that appears, proceed to configuring the ActionTask.
Creating a New ActionTask
You can quickly create an ActionTask on the spot if you can’t find the right kind in your library. After creating it, it will appear in your library and you will be able to reuse it.
- From the Designer Panel, drag-and-drop he Task element onto the work area:
- Drop it on an empty space to create its inbound and outbound connections later;
- Drop it onto an existing connector (wait for the connector to become blue first) to place it on the path between two existing objects.
- In the Task Wizard on the right, click Create a new Task.
- Fill in the following details:
- Namespace—Namespace to create the ActionTask in.
Select an existing namespace from the list or type in a new namespace name in the following format:<namespaceName>.<subnamespaceName>. - Name—Type in a name for the ActionTask.
- Description—Optional. Type in detailed information about the ActionTask's purpose.
- Task Timeout (sec)—Set a delay to allow enough time for the operation to perform.
- Namespace—Namespace to create the ActionTask in.
- In Select a task template, select what to base the new Task on:
- Select Generic Action Task to create an empty ActionTask.
- Select one of the following templates to create a Task with a predefined set or features:
- Make a RESTful API call
- Execute command over network
- Execute command locally
- Click Create.
- In the Task Properties panel that appears, proceed to configuring the ActionTask.
Configuring Task Properties
After adding a Task element to the automation model, you can set its properties in the Properties Panel.
The following table explains the available properties.
| Feature | Description |
|---|---|
| Display Name | The name that will appear in the Work Area. It can differ from the name of the selected ActionTask. |
| Task Name | Shows the name of the selected ActionTask. Click the Search icon or start typing an ActionTask name to select a different ActionTask. Use the Play button to execute the selected ActionTask outside of the Automation. |
| Merge | Select the merge type: ALL, ANY, Targets. See more information on merging, see Automation Model Flow Control. |
| Configure | Lets you configure the Input and Output parameters of the Task. |
| View | Displays all the ActionTask configuration, including permissions, Assessor script, and so on. |
Configuring Task Parameters
You can set two types of parameters when configuring a Task in the Properties Panel: Input and Output. These are used to pass data in and out of the Task to other automation model objects.
To configure Task parameters, to the following:
- In the Properties Panel for a Task, click the Configure tab.
- Select which type of parameters to configure:
- Click the Input tab to set variables in the
INPUTobject. - Click the Output tab to set variables in the
OUTPUTobject.
- Click the Input tab to set variables in the
- Select an action:
- To reconfigure a parameter, select it in the table view and then click Edit .
- To add a new parameter, click Add and then follow the instructions in Adding or Editing a Parameter.
You cannot add Output parameters. - To delete a parameter, select it in the table view and then click Remove.
Default parameters cannot be removed.
How to Read the Parameter List
Each of the Input and Output tabs contains a table view listing the available parameters. The table breaks the parameters into two categories:
- Default—Parameters coming from the original ActionTask definition. Note that you can still customize these parameter's values without affecting the original ActionTask definition.
- Custom—Parameters that you define for this particular ActionTask instance. These parameters are not saved with the original ActionTask.
The table's columns show the following:
- Name—The parameter name.
- Source/Destination—Where the parameter's value comes from (for inputs) or is going to (for outputs):
DEFAULTmeans that:- For input parameters, the value comes from the original ActionTask definition.
- For output parameters, the value will be written to the OUTPUTS map.
User Definedmeans that the value is custom set to a string or a reference.WSDATA,PROPERTY,INPUT,OUTPUT,FLOW,PARAMmean that the value comes from (for inputs) or will be written to (for outputs) one of those maps. A different subset of maps is available for input and output parameters.
- Value—Only available for input parameters The current value of the parameter.
- Values in black represent default values defined in the original ActionTask or values of custom parameters.
- Values in orange represent customized values of default parameters.
- Variable—Only available for output parameters When you have selected a destination other than DEFAULT (WSDATA, FLOW, PARAM), this is the name of the variable from the destination map that will store the value. For CONSTANT this is a string value.
Adding or Editing a Parameter
Choosing to add or edit a parameter opens the Add Parameter or Edit Parameter dialog boxes that have similar functionality. They let you configure or reconfigure the parameter.
- Name—Enter a name for the parameter. If you are editing a default parameter, this field is a read-only label. Allowed characters are alphanumeric and underscore. The name must start with a letter.
- From Source—Only available for input parameters Select where the parameter's value will come from:
CONSTANT—Allows you to set the value to a string or a reference. Use the text field to the right to type in the value. Same as using the Custom Value option.WSDATA,PROPERTY,INPUT,OUTPUT,FLOW,PARAM—Select one of these maps and then select a variable from the map to use as a source for the parameter. You can also enter a variable name that will:- For output parameters, define a new variable to pass on to the next step in the automation model.
- For input parameters, this is a way to access a variable that you have created in your Groovy code.
- To Destination—Only available for output parameters Where the value is going to:
DEFAULTmeans that the value will be written to a variable in the OUTPUTS map with the same name as the parameter.CONSTANT—Has no practical application.WSDATA,FLOW,PARAMmean that the value will be written to the selected map. Using the text box on the right, you can choose the name of the variable to store the value inside the map.
- Custom Value—Only available for input parameters Same as the From Source:
CONSTANToption. Provides the Add Variable button to make entering a reference to an existing variable easier by selecting it from the available maps.
The changes you make in this dialog box will appear in the Input/Output table view when you update/create the parameter.
Template Types
You can base a new Task on a template. Actions Pro comes preconfigured with the following templates:
- Make a RESTful API call
- Execute command over network
- Execute command locally
Make a RESTful API Call
The Make a RESTful API call new Task template allows you to set up a call over HTTP or HTTPS using the standard HTTP methods: GET, PUT, POST, DELETE, HEAD, OPTIONS, and TRACE.
After you select this template when creating a new Task, you need to configure the following options:
- URL—First, select the HTTP method to use from the drop-down list and then enter the URL to call, including the protocol prefix:
http://orhttps://. If you omit the protocol, HTTP is implied. - Headers—Enter HTTP headers to send with the request as key-value pairs.
- Params—Enter query parameters as key-value pairs to append to the request URL.
- Body—Only available for the applicable HTTP methods.
- form-data—Enter the request body as key-value pairs and send it in form-data format.
- raw—Enter the request body in raw format (plain text, JSON, or XML) and send it as raw data.
- Syntax—Select the raw data format from the drop-down list.
- Add Variable—Allows you to select an Actions Pro variable and reference it from the body.
Variables are inserted in the following format:$MAP_NAME{varName}. You can also use it to manually reference variables form the body.
You can further configure your request after you have created the Task, such as setting the authentication type. Take these steps to see all available options:
- Open the Task's Task Properties panel.
- In the Parameters section, click Show in: Table Mode.
A list of Input and Output parameters appears. - Set the parameters as explained in Configuring Task Parameters.
The list below details each of the default parameters.
Input parameters:
- basicauthuserid—User ID for Basic Authentication. Enables Basic Authentication when set together with
basicauthpassword. This parameter will be ignored if you havebearertokenset. - basicauthpassword—Password for Basic Authentication. Enables Basic Authentication when set together with
basicauthuserid. This parameter will be ignored if you havebearertokenset. - EXPECT_TIMEOUT—Sets a timeout for receiving a request response.
- method—The HTTP method.
Whatever method you set when creating the Task will appear here. - followredirect—Whether to follow HTTP redirects when making the request. Possible values:
trueto follow,falsenot to follow. If not specified, false is implied. - commandUrl—The request URL.
Whatever URL you set when creating the Task will appear here. - headers—Headers to send with the request. This is a map of header name and header value pairs separated by a comma or a string of header name:header value separated by the pipe (|) symbol. The
CookieandAuthenticationheaders specified here have precedence over thecookiesorbasicauthuserid/basicauthpasswordandbearertokeninput parameters.
Whatever headers you set when creating the Task will appear here.
Examples:"Accept:*/*|Content-Type:application/json; charset=utf-8".Authorization:$PARAM{variable_name},Content-Type:raw - cookies—Cookies to send with the request. This is a map of cookie name and cookie value pairs or a string of cookie name=cookie value separated by a semicolon followed by a space ("; ").
Example:"Cookie1:Value1; Cookie2=Value2" - useFormData—Whether to use form-data format for the body. Possible values:
truefor form-data,falsefor raw. - body—Contains the body of the request. The body format depends on the selected body type.
- bearertoken—The token string for Bearer authentication. Enables Bearer authentication when set and disables Basic authentication (
basicauthuseridandbasicauthpassword) if both are specified. - disableSSL—Do not use SSL encryption for the request.
- rawBody—Reserved for future use.
- sessionName—Reserved for future use.
Output parameters:
- responsemessage—Contains the text message part of the request response.
- responsecode—Contains the HTTP status code from the request response.
- responseheaders—Map containing the HTTP response headers.
The keys are header field names and the values are lists of field values. - responsebody—Contains the request response body.
- responsecookies—Map containing the cookies from the HTTP response
Set-Cookieheader. The keys are cookie names and the values are cookie values.
Instances with Organizations
If an instance uses Organizations, add the relevant Organization as the value of the RESOLVE.ORG_NAME URL parameter.
For example:
GET https://{host}:{port}/resolve/rest/getActionTaskResult?PROBLEMID=ACTIVE&PROCESSID={processid_value}&ACTIONTASK_DETAIL_OUTPUT={actiontask_full_name}&TIMEOUT=1&RESOLVE.ORG_NAME=MYORG
The user authenticated with via GET https://{host}:{port}/resolve/rest/login?username={user}&password={password} must have access to the relevant Organization.
Cookie Handling Between Multiple Requests
If you need to submit a cookie or another value, such as a bearer token, received in response of one request for use in multiple subsequent requests, store the cookie in the FLOWS map. If you pass it out using OUTPUTS, it will only be available in the next ActionTask or Automation.
Adding an SSH Connection
The SSH connection allows you to connect to a machine or another type of network equipment that supports SSH connection. There are two way to add an SSH connection step to your Automation Model:
- Using the SSH object from the Designer Panel.
- By adding a Task
Using the Designer Panel
The Designer Panel provides an object under its Connection section called SSH. It is the quickest way to add an SSH connection step to your Automation Model.
Take these steps to add SSH to your Automation Model:
- From Designer Panel > Connection, drag-and-drop the SSH object to the working area.
- In the dialog box that opens, configure the connection as explained below.
These are the options associated with the SSH connection:
- Connection tab
- Host—The SSH host to connect to. Select CONSTANT to set it to a static IP address or hostname or any of the variable collections to set it dynamically.
- Port—The SSH port of the SSH host. Select CONSTANT to set it to a static value or any of the variable collections to set it dynamically.
- Auth Type—Authorization mechanism used by the SSH host: Username and Password for password authentication or Key Filename and Passphrase for public key authentication. Your selection here determines the following fields.
- Username/Password—These fields appear when you select Auth Type: Username and Password. Specify the SSH username and the password. For each field, you can select CONSTANT to set it to a static value or any of the variable collections to set it dynamically.
- Username/Key/Passphrase—These fields appear when you select Auth Type: Key Filename and Passphrase. Specify the SSH username, public key, and the passphrase protecting the public key. For each field, you can select CONSTANT to set it to a static value or any of the variable collections to set it dynamically.
- Prompt—A particular screen character that the computer will wait for.
- Timeout (secs)—Set a delay in seconds to allow enough time for the operation to complete.
- Queue Name—The name of the RSRemote queue to use to execute the connection. Select CONSTANT to set it to a static value or any of the variable collections to set it dynamically.
- Session Name—Specify a name for the session that will be created for this connection. Optional when you have a single connection. Required if you have multiple connections to be able to distinguish between sessions.
- TASK tab—All options on this tab are optional.
- Select a Task/Create a New Task—Select an existing or create a new ActionTask to be executed after successfully opening the connection. The new task option only allows you to add a command line to execute or to execute a command line from a variable.
By Adding a Task
This method only allows you to tap into an existing connection session that you created using the Connection > SSH element.
When you add a Task to your Automation Model, you can configure it to execute a network connection.
Take these steps to configure a new task to perform an SSH connection:
- From Designer Panel > Connection, drag-and-drop the Task object to the working area.
- In the Task Wizard on the right, click Create a new Task.
- Select namespace and enter a name for the task.
- In Select a task template, select Execute command over network.
- In Select connection type, select SSH.
- Configure the rest of the fields as explained below and finally click Create.
These are the options associated with the SSH connection:
- Session Name—Type the name of an existing session that you created using Connection > SSH.
- Command—Command line to execute after successfully opening the connection. Click Add Variable to execute a command line from a variable.
- Expected Timeout (sec)—Set a delay in seconds to allow enough time for the operation to complete.
- Prompt—A particular screen character that the computer will wait for.
- Queue Name—The name of the RSRemote queue to use to execute the connection. Select CONSTANT to set it to a static value or any of the variable collections to set it dynamically.
Adding a Telnet Connection
The Telnet connection allows you to connect to a machine or another type of network equipment that supports Telnet connection. There are two way to add a Telnet connection step to your Automation Model:
- Using the Telnet object from the Designer Panel.
- By adding a Task
Using the Designer Panel
The Designer Panel provides an object under its Connection section called TELNET. It is the quickest way to add a Telnet connection step to your Automation Model.
Take these steps to add TELNET to your Automation Model:
- From Designer Panel > Connection, drag-and-drop the TELNET object to the working area.
- In the dialog box that opens, configure the connection as explained below.
These are the options associated with the Telnet connection:
- Connection tab
- Host—The Telnet host to connect to. Select CONSTANT to set it to a static IP address or hostname or any of the variable collections to set it dynamically.
- Port—The Telnet port of the SSH host. Select CONSTANT to set it to a static value or any of the variable collections to set it dynamically.
- Username—The username to use to authenticate the Telnet session. Select CONSTANT to set it to a static value or any of the variable collections to set it dynamically.
- Password—The password to use to authenticate the Telnet session. Select CONSTANT to set it to a static value or any of the variable collections to set it dynamically.
- Timeout (secs)—Set a delay in seconds to allow enough time for the operation to complete.
- Login Prompt—A particular screen character/string that the computer will wait for to recognize as the username prompt.
- Password Prompt—A particular screen character/string that the computer will wait for to recognize as the password prompt.
- Queue Name—The name of the RSRemote queue to use to execute the connection. Select CONSTANT to set it to a static value or any of the variable collections to set it dynamically.
- Session Name—Specify a name for the session that will be created for this connection. Optional when you have a single connection. Required if you have multiple connections to be able to distinguish between sessions.
- TASK tab—All options on this tab are optional.
- Select a Task/Create a New Task—Select an existing or create a new ActionTask to be executed after successfully opening the connection. The new task option only allows you to add a command line to execute or to execute a command line from a variable.
By Adding a Task
This method only allows you to tap into an existing connection session that you created using the Connection > TELNET element.
When you add a Task to your Automation Model, you can configure it to execute a network connection.
Take these steps to configure a new task to perform a Telnet connection:
- From Designer Panel > Connection, drag-and-drop the Task object to the working area.
- In the Task Wizard on the right, click Create a new Task.
- Select namespace and enter a name for the task.
- In Select a task template, select Execute command over network.
- In Select connection type, select TELNET.
- Configure the rest of the fields as explained below and finally click Create.
These are the options associated with the SSH connection:
- Session Name—Type the name of an existing session that you created using Connection > TELNET.
- Command—Command line to execute after successfully opening the connection. Click Add Variable to execute a command line from a variable.
- Expected Timeout (sec)—Set a delay in seconds to allow enough time for the operation to complete.
- Prompt—A particular screen character that the computer will wait for.
Adding an Automation
You can add a entire Automation as an element in your automation model. This action helps you reuse automation logic between projects. An Automation with a nested sub-Automation behaves as though the sub-Automation model were copied-and-pasted into the parent model. Sub-Automations allow you to conveniently organize and reuse logic, making your solutions modular. If a series of tasks/logic will be used in multiple processes, consider developing it as a sub-Automation with the right kind of flexibility in its design.

Take these steps to add an Automation:
- From the Designer Panel, select the Automation element and drag it over to the work area.
- In the Runbook Wizard on the right, do one of the following:
- Select an existing Automation:
- Click Select an existing Runbook.
- In Select Runbook, do one of the following to select an Automation:
Note: Automations use the following naming format in the automation model:<automationName>#<namespaceName>.<subnamespaceName>.- Start typing the Automation name and select it from the filtered list.
- Click the Search (magnifier) icon to open a content browser where you can browse by menu path or namespace.
- Click the down-arrow icon to open a drop-down list containing all available Automations.
- Click Done.
- In the Runbook Properties panel that appears, proceed to configuring the Automation.
- Create an Automation:
- Click Create a new Runbook.
- Select namespace and enter a name for the Automation.
- Click Create.
An empty Automation is created in your library. - In the Runbook Properties panel that appears, proceed to configuring the Automation.
- Click the Open in new browser tab icon next to the Automation name to create its automation model.
- Select an existing Automation:
Sub-Automation Data Handling
It is important to consider data handling when designing a solution using sub-Automations. The best practice is to use the sub-Automation as an extension of the parent Automation. If a sub-Automation is designed to always be embedded within another Automation, then FLOW variables are most appropriate for passing data in and out of the sub-Automation. However, if the sub-Automation can be run on its own, then using FLOW variables might cause difficulties because an independent process will typically be designed to expect PARAMS. In this case, it is best to think of the sub-Automation as a separate unit, and as such, to pass in PARAMS. An good approach is to insert a Task before the sub-Automation to marshal the data.
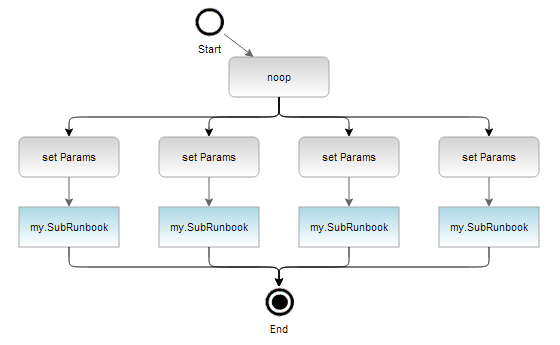
The following figure shows preset variables in sample sub-Automations.
Logic Simplification
Complex Automations can grow to contain a very large number of ActionTasks, even hundreds of them. Two major issues that arise are the difficulty to maintain the Automation and the slow startup time. Using a sub-Automation can address the maintenance issue through compartmentalization, although it might actually add to the startup time. Sub-Automations can thus simplify the logic and organization of a complex Automation, as well as adding re-usability. Separating a complex Automation into sub-Automations allows different teams to develop different parts of a solution.
When creating a sub-Automation from a larger parent Automation, analyze the Automation by isolating sets of tasks that can operate independently of the main Automation (a sequence of ActionTasks with one incoming path and one exit). Create a new Automation from the isolated tasks and call it as a sub-Automation from an ActionTask in the primary Automation.
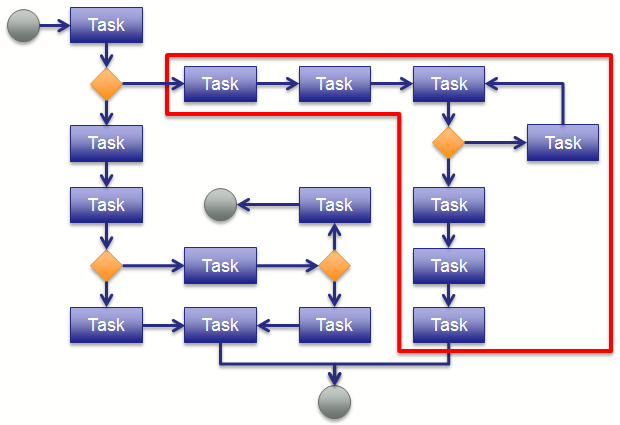
The following figure shows a group of tasks that can potentially be extracted into a sub-Automation.
Sub-Automation Considerations
There are several points to consider when incorporating sub-Automations.
- The sub-Automation is treated as part of the parent process, with access to the same variables/context and overall preferences (debug, loops, timeout, etc.) set in the parent "Start" task. Switching Problem IDs (from the parent) is therefore not possible.
- Embedding sub-Automations within sub-Automations is allowed.
- Use only one "End" task in the sub-Automation.
- The parent Automation must include its own "End" task, so it cannot have a sub-Automation as the last element node.
- Have an agreed-upon convention for handling data in sub-Automations, especially regarding what wiki documents expect with parameters/context.
- Use a data-marshaling ActionTask before a sub-Automation that passes data as FLOWS (for always embedded sub-Automations) or PARAMS (independent sub-Automations).
- Take care passing PARAMS with sub-Automations: if any inputs in the sub-Automation use direct replacement of params ($PARAM{}, which should be avoided anyway), then the PARAMS are inserted at the start of the parent Automation and not at the start of the sub-Automation.
Controlling Automation Timeout
Processes in Actions Pro have a time limit to waiting for tasks or events to complete execution. The default timeout for automation is set to 10 minutes. It may be necessary to increase or decrease this value.
To adjust the timeout value for automation, edit the PROCESS_TIMEOUT parameter. In the Inputs section for the Start task, go to Edit to bring up the Input Edit Parameter dialog box.
The parameter value is denoted in minutes.
PROCESS_TIMEOUT default value is set to 30 minutes explicitly for the Start task in System.GitPushAutomationChanges runbook.